
Audio devices
Choose the input and the output
To record, the application needs an input device (your microphone, or an audio interface) and an output device (your headphones or speakers) for playback.
Every track has its own input selector, right on the track in the multitrack view. This lets you record two tracks from two different inputs.
The full input and output lists, and the choice of default devices, are set in Settings › Input devices and Settings › Output devices.
Input and recording settings
Two windows of the Settings menu share these options.
Settings › Input devices lists one row per input detected on the machine.
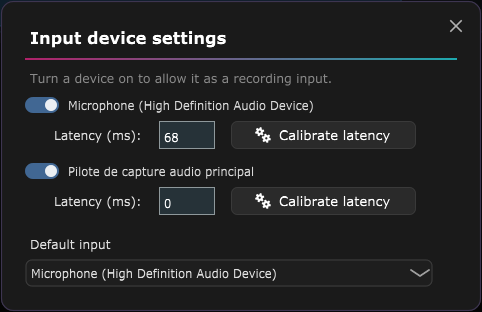
- Turn on the switch of a device to allow it as a recording input; turn it off to remove it from the tracks' input selectors.
- Each row also has a latency compensation field in milliseconds (left empty until the latency has been calibrated) and a "Calibrate latency" button (see below). Both are greyed out for a disabled device.
- A "Default input" menu picks the input offered by default on a new track.
Settings › Recording sets how recording behaves: the "Recording starts playback" switch (on by default: a click on the transport bar's record button starts playback straight away while recording; off, it only arms recording and you then press Play), and the Before recording section (see the Recording chapter): pre-roll, countdown, and what you hear during that countdown (metronome, already recorded music).
Every change is saved immediately. There is no confirm button, close the window with the cross or the Escape key.
Playback settings
Open Settings › Output devices. It lists the detected audio outputs, with a switch per output, and a "Default output" menu to pick the one used for playback.
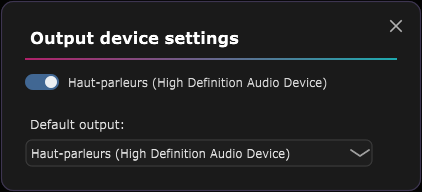
As with the inputs, every change is saved at once, with no confirm button. An output has neither latency compensation nor a calibration button: latency only matters for recording.
Calibrate latency
There is always a short delay between the moment a sound enters your interface and the moment the application receives it. This delay, the latency, shifts your recordings against the tracks already in place.
The "Calibrate latency" button, next to an input in the Input devices settings, measures this delay. The application first asks you to choose the calibration method:
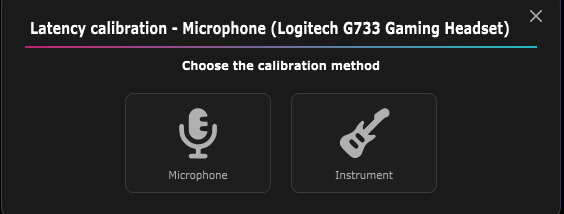
- Microphone: a brief sound is played through the audio output and captured by the microphone. Place the microphone near the speaker (or connect output and input with a cable). On a multi-input interface, pick the right input (Input 1, Input 2, Input 1+2…): the one the microphone is plugged into; a small level bar confirms the sound is coming through. Start the calibration, then confirm the measured value.
- Instrument: for an instrument plugged into an interface (guitar, bass, keyboard…), with no microphone. Plug the instrument into the chosen input and headphones or speakers into the output. Pick the right input (Input 1, Input 2, Input 1+2…); a small level bar confirms the instrument is coming through. Start the calibration: a metronome starts playing, play one note in time on every beat for about thirty seconds. A progress bar shows how confident the measurement is; below it, a lane scrolls the upcoming beats so you can see them coming, and a countdown shows the time left. The measurement ends at 100% confidence or after ~30 seconds; a "Cancel" button stops it at any time. The first few seconds may be rough, the time it takes to lock onto the pulse.
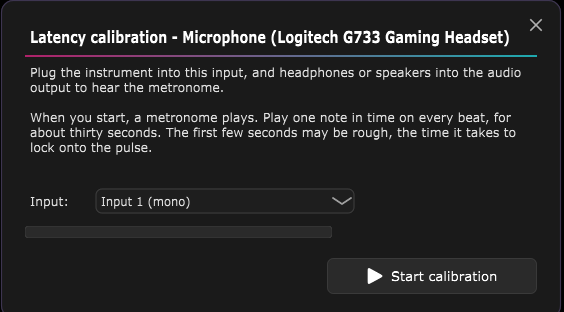
In both cases the confirmed value is written into that input's latency compensation field, and your future recordings are lined up.
The first time you pick a never-calibrated input in a track's selector, this window opens automatically to prompt you to calibrate it. A latency typed by hand (0 included) counts as calibrated and does not trigger that again.
ASIO drivers
An ASIO driver (such as ASIO4ALL, or the driver shipped with a Steinberg, Focusrite or other interface) offers lower latency. In return it takes exclusive control of the audio hardware while it is open.
The application handles this case automatically. If an armed track uses an ASIO driver and playback cannot start on the normal output, the application moves playback onto the already open ASIO connection and tells you with a message. There is nothing special for you to do.
Likewise, calibrating the latency of an ASIO input works even when another track already holds that driver open: the calibration attaches to the existing connection, without asking you to disarm anything.
The calibration sound (the microphone test's click, or the instrument test's metronome) always plays through the output chosen in Settings > Output devices - never through an ASIO driver's own outputs just because it's being used as an input - exactly like the rest of the application always keeps the recording input separate from the listening output. Only in rare cases (for instance, the same interface set as both the default input and the default output) is that not possible: a small "i" then appears next to the input picker to warn you that the calibration sound will exceptionally play through that same input instead.
ASIO is a trademark of Steinberg Media Technologies GmbH, registered in Europe and other countries.